The Configero Grid for Salesforce gives users the power to dynamically search, filter and update thousands of records in a single, intuitive screen without ever leaving the tool.
Installation
The Configero GRID requires the free Configero Data Loader package. Please install this package first from the Appexchange.
Before using the Grid, make sure you add the following url to the Remote Site Settings list (Setup->Administration Setup->Security Control->Remote Site Settings)
https://powerloader.[Server].visual.force.com
Where [Server] is your specific Salesforce instance server. You can find it in your browser address bar, for example if your Salesforce URL is
https://na8.salesforce.com
Then your server is na8, and you need to add the following to the Remote Site Settings:
https://powerloader.na8.visual.force.com
Once the Configero Data Loader is installed, you can continue installing the GRID from the Appexchange listing.
Setting User Permissions

During step 2 of the installation process, you will be able to choose security settings for the DataLoader. We recommend that you 'Select security settings' and add the Grid permission to those users that need it.
Setting Up Your Grid Tab
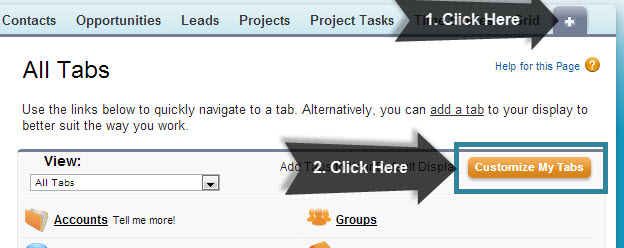
First click on the + Icon on your Salesforce Navigation Bar.
Then click on the Customize My Tabs button once the page loads
Select Grid from the Available Tabs list and add it to Selected Tabs
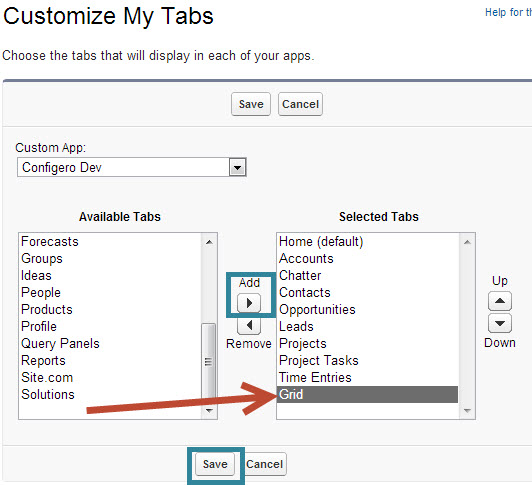
You may now start using the grid by pressing on the Grid tab in your navigation bar.
Business Cases
Overview
Salesforce.com is a revolutionary tool for managing large volumes of data, but many users find it time consuming and inefficient to perform updates in bulk across records. Built on the Force.com platform, Configero developed the grid technology framework to address the limitations with standard, out-of-the-box functionality by delivering a rich user experience for bulk editing, business process execution and collaboration. Through a deep integration with Salesforce.com, the native grid technology brings enhanced capabilities, enabling users to process large amounts of data without ever leaving the tool.
Now, instead of manually scrolling through pages and lists and exporting data to Excel for easier manipulation, users have the power to dynamically search and filter records by any custom or standard object to see a list of relevant records available for mass editing, updating and business process execution. Leveraging integration with Chatter collaboration, all stakeholders tied to records gain real-time visibility into changes and progress as well as automated alerts and routing based on workflow rules and business processes.
Examples of use-cases include:
Lead Management
- Mass Escalate all Unconverted Leads created in the past week that are still Unread by Owner
- Create Bulk Chatter Posts on all Unconverted Leads with Last Activity greater than 45 days ago
Contact Management
- Bulk Editing the field Email Opt Out = True on all Contacts with an Email Bounced Date
- Mass Follow all Contacts with Lead Source “Web” and custom field Opportunity Count > 0
Opportunity Management
- Create Bulk Chatter Posts on all Opportunities with Probability greater than 50% where HasLineItem = False (indicating no Opportunity Products)
- Mass Follow all Opportunities with Probability greater than 40%
Case Management
- Mass Email Contacts on a filtered list of Cases, for example, by Case Type and Date Opened
General Usage
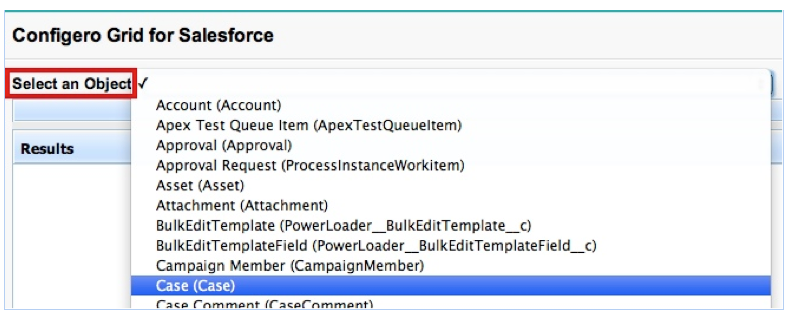
1. Object Selector
First, select the Object that you wish to drill into for dynamic filtering, bulk-editing, mass business process execution and/or collaboration.
Any Standard or Custom Object is available for selection; however, native Salesforce functionality still applies. For example, all records that will be bulk-edited at one time must be of the same Record Type.
2. Query Panel (aka Global Criteria Filters)
Next, set the global filters in the Query Panel.
Global criteria filters will vary based on the object but often include logic such as “Open vs. Closed,” “My Owned, My Managed Owners and/or My Created” and key date filters (Case Open Date, Lead Converted Date or Opportunity Close Date).
Users can combine multiple global filters at one time. In the example below, the user is filtering for Cases that are:
- In All Statuses and belong to All Owners/Creators that are “High” Priority, of “Email” Origin and of Reason “Breakdown” and were opened within the Last 7 Days
Once you have selected all of your global filters, hit the Search button.

Please also note that the Query Panels can be customized for your unique Object configurations; to learn more, please submit this form or phone us at (855) CRM-HERO (855-276-4376).
3. Results Panel
The Configero Grid for Salesforce is highly intuitive and the functionality shown below applies to any object accessed through our Grids including data updates made via the Configero Data Loader for Salesforce, Configero’s Mini-Grid for Related Lists and Configero’s PSA App for Project Management.
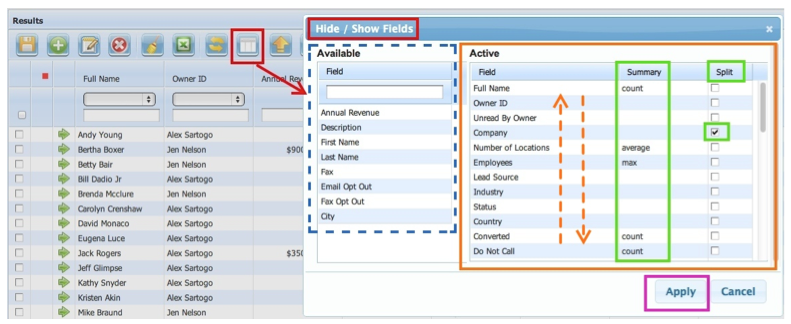
Customize the Results Panel
Each User has the flexibility to define which columns are displayed in his/her view of the Grid and, as well, to define the order that the columns are displayed through a simple drag-n-drop interface. Additional column customizations include:
- The ability to define which column creates a “split” which will freeze columns to the left of the split as the User scrolls to the right on the Grid
- The ability to add Summary Totals to columns including such functions as COUNT, SUM, MIN, MAX and AVG
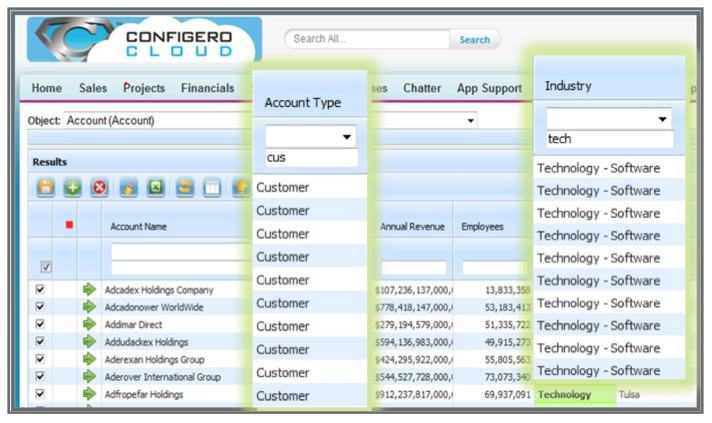
Use Multi-column Dynamic Filtering to narrow Results
Once populated with records, multiple columns can dynamically filter the Results Panel at one time.
In the example below, the User has typed the string “cus” in the Account Type filter field and the string “tech” in the Industry filter field – the default operation is LIKE and there is no need for the User to enter wildcards such as * or % around the string:
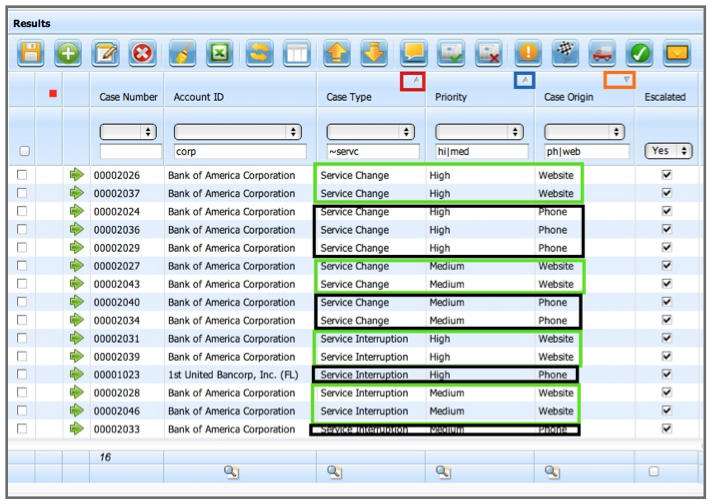
Use Multi-column Sorts to Organize the Results
Once populated with records, Users can sort the Grid Results Panel by multiple columns at one time.
In the example below, the User has clicked the Case Type column header to create a Primary Sort of Case Type – Ascending, then used Shift-click on the Priority column header to create a Secondary Sort of Priority – Ascending and finally used Shift-double-click on the Case Origin column header to create a Tertiary Sort of Case Origin – Descending.
Select Multiple Records for Bulk Editing
Multiple records can also be selected at one time from the Grid and “Bulk Edited”; for example, all Cases Opened TODAY of Case Type “System Down” can be “bulk edited” at one time to Status “Customer Notification Posted” and Owner “Tier 2 Support (Queue)” as soon as IT has activated the “This website is temporarily unavailable” message.
In the example below, a filtered list of Leads is being Bulk Edited for a change of Owner; also notice how the Full Name field has been filtered using the string “and|b” – not only are we able to insert an OR into our default LIKE statement for filtering by using the "|" symbol (this is the vertical line just above the RETURN key of most keyboards), we have also demonstrated that the minimum length required for a text filter string is 1 character – we have filtered for any Leads with a Full Name LIKE and OR b:

Grid column filters will also support the & function and the ~ function and these additional functions can be used in combination with each other as well as with the | function noted above. For example:
- Use the string gen&unc to find any Case Subject with both the string gen and the string unc such as “Generator instructions unclear” or “Unclear instructions on generators”; this function also allows a minimum of 1 character
- Use the string ~surprise to find any Task Description that contains the string surprise as well as any approximate match to the string surprise to account for possible spelling errors; please do note, however, that the approximation ~ function does require a minimum of 3 characters in the string
- Use the string rack&~srvr to search for any Opportunity Name that includes both the string rack and the string srvr as well as any approximate matches such as server
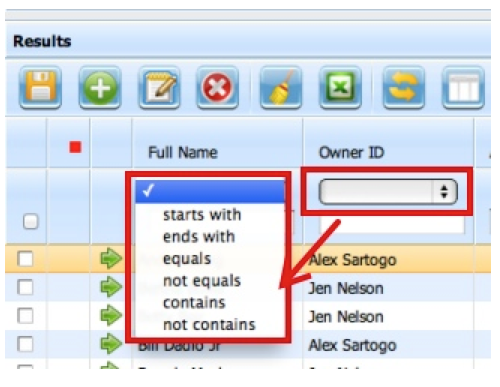
Finally, the header of every column in the Results Panel has additional Filter Operators for “Starts with,” “Ends with,” “Equals,” “Not equals,” “Contains” and “Not Contains” that can be used in conjunction with the text filter fields.
Use Native In-line Editing with Bulk Edit for Exceptions
The Bulk Edit functionality can also be used in combination with In-line Editing for exceptions on individual records in the data set.
In the example below, the User has leveraged the Bulk Editing function on both the Unread by Owner (check box) and the Industry (picklist) fields and has also leveraged the native In-line Editing function to correct the Lead Source from “Purchased List” to “Web” on a single record – all in one Bulk Edit session!

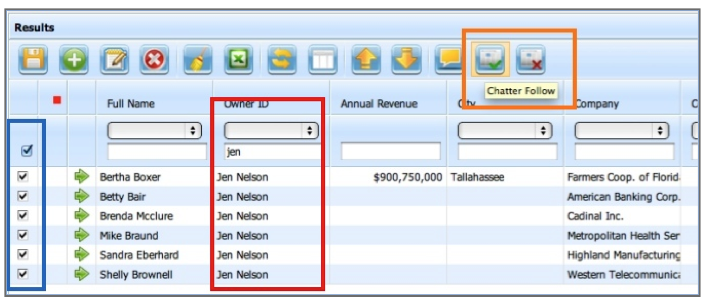
Select Multiple Records for Mass Actions
Multiple records can also be selected at one time in order to perform object-specific or global mass actions.
A few examples of object-specific mass actions would include Case Actions such as “Mass Close” or “Mass Email Case Contacts.”
Global mass actions available for nearly all Standard and Custom Objects include “Chatter Post,” “Chatter Follow,” “Chatter Unfollow” and “Export to CSV.”
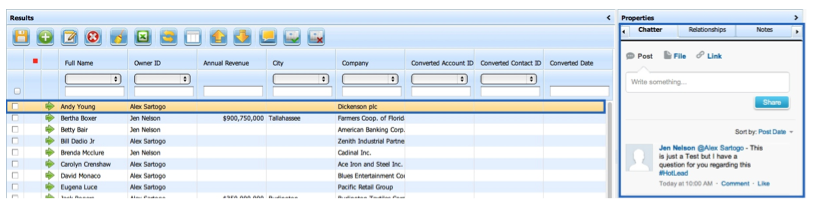
In the example below, the User “Jen Nelson” has filtered a list of Contacts, selected all records in the filtered list and clicked the “Chatter Follow” button to automatically follow all selected Contacts.
Manage Additional Communications on Records
Within the Grid, Users can also manage additional communication related lists in the Properties panel including each Record’s Chatter Feed, Object Relationships, Notes and Attachments.
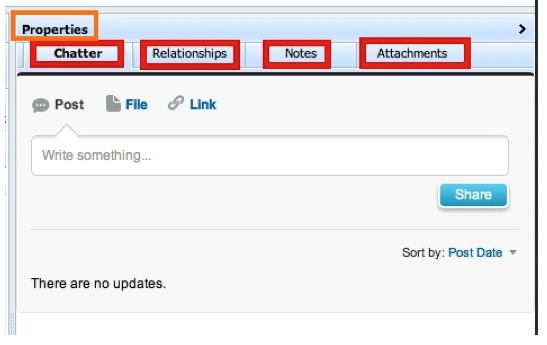
In the below example, the record for “Andy Young” has been highlighted so that the Properties Panel updates to display the Chatter, Relationship, Notes and Attachments tabs for “Andy Young.”
First, the Chatter tab is displayed:
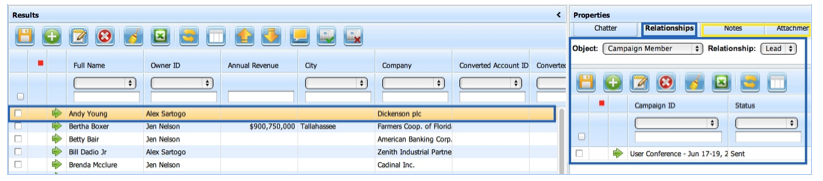
Next, the User can click on the Relationships tab and select from the available Relationships to the original Object. In the example below, Lead was the original Object so Relationships include Object selections such as Campaign Member (shown), Event, Task or Content. As you can see, the Lead “Andy Young” has been Sent the Campaign for “User Conference – June 17 – 19” but he has not yet Responded:
Finally, as highlighted in Orange below, each Record in the Grid also has a “Notes” and an “Attachments” tab in the Properties Panel. As you can see, a file attachment “Lead Survey Response” has been linked to the “Andy Young” Lead record:

New Feature - Query Panel Wizard
The Configero Grid for Salesforce now includes a Query Panel Wizard to allow System Admins to create their own basic Query Panels for each Object accessed via a Grid. Note that advanced Query Panel customization such as Ownership filters and Smart Date filters still require custom development; to learn more, please send an email to Configero Support or phone us at (855) CRM-HERO (855-276-4376).
Create a Query Panel for an Object
Initially, an Object selected in the Grid will not have a pre-defined Query Panel and will simply display a general Query for the Name field of the Object as shown below:
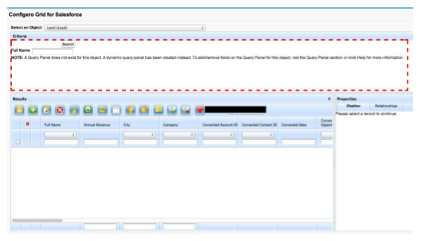
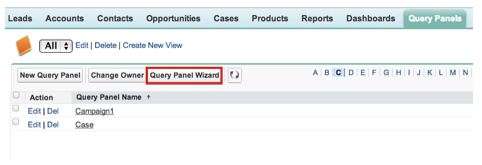
In order to create your own custom Query Panel, go to the "Query Panels" tab that was installed as a part of the Configero Grid for Salesforce application and into one of the Query Panels List Views. Click on the custom list view button labeled "Query Panel Wizard" as shown below.
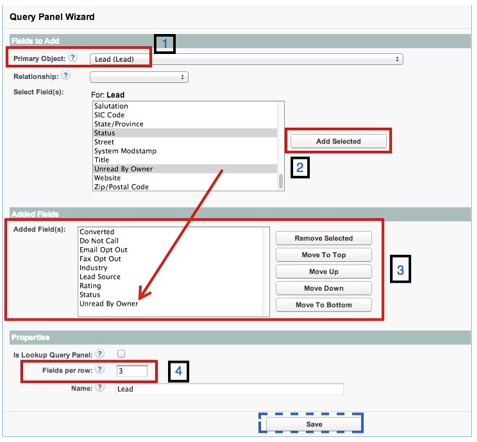
The Query Panel Wizard has 5 primary steps:
- Select the Primary Object for which you are creating your Query Panel
- Choose the fields that will be included in your Query Panel
- Define the Sort Order of the fields included in your Query Panel
- Define the number of rows that the selected fields will be grouped into on your Query Panel
- In the screen shot below, you see 9 fields selected and 3 rows defined so the first 3 fields (Converted through Email Opt Out) will appear in Row 1, the next 3 fields (Fax Opt Out, Industry and Lead Source) will appear in Row 2 and the final 3 fields (Rating, Status and Unread by Owner) will appear in Row 3
- Save - Upon Save, the Query Panel Wizard will auto-generate the necessary code and update the Grid for the Primary Object selected.
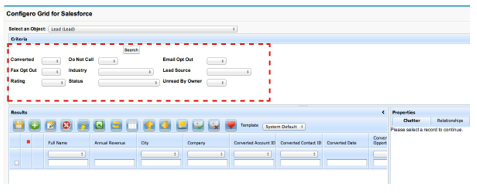
Once your new Query Panel has been saved, you can return to your Grid and refresh the view for the selected Object to begin using the new Query Panel:
Open Grid with Pre-Selected Object
First, you have to get the link to your Grid by clicking on the Grid tab and getting the URL from your address bar.

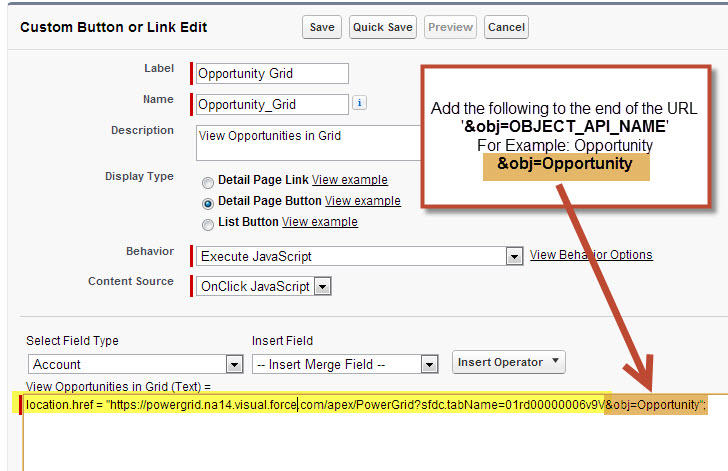
Copy and paste the URL from the address bar, and then create a new Custom Button on any object.
For Display Type select Detail Page Button
For Behavior use Execute Javascript
For Content Source use OnClick Javascript In the content box, add the following: location.href = "[GRID LINK YOU COPIED]&obj=OBJECT_API_NAME"; (See example below)
Finally, add the Custom Button to your page layout and begin using!

Example: Default to 'Account' object and Add button to toolbar:
<apex:page sidebar="false">
<PowerGrid:PowerGrid />
<script>
// if you want to restrict to one type using Javascript
getDefaultObject = function() {
	return 'Account';
}
hideObjectSelector = function(){ return true; }

// add buttons to toolbar - objType is API name of the grid that's being displayed
function postProcessToolbar(toolbar, objType, grid_var) {
	toolbar.push(
		{ type: 'separator' },
        {
                type: "button",
                id: "SOMETHING_UNIQUE_GOES_HERE",
                img: "Configero/users.png",  // can be any static resource like urlfor($Resource...)
                tooltip: 'SOME TOOLTIP',
                onClick: function(grid) {
                	// handle onclick here

					// gets the selected ID
					/*
                    var sel = grid.getSelectedId();
                    if (!sel || sel == '') {
                    	alert('Please select a record to continue.');
                    	return;
                    }
                    */

                    // gets checked IDs
                    /*
                    var sel = grid.CF_getGridCheckedRows();
                    if (sel.length == 0) return;
                    var selectedIds = [];

                     for (var i = 0; i < sel.length; i++) {
                         rec = grid.CF_getBufferSequenceRec(sel[i]);
                         selectedIds.push(rec.idd);
                     }
                    */
                }
            }
	)
}

</script>
</apex:page>