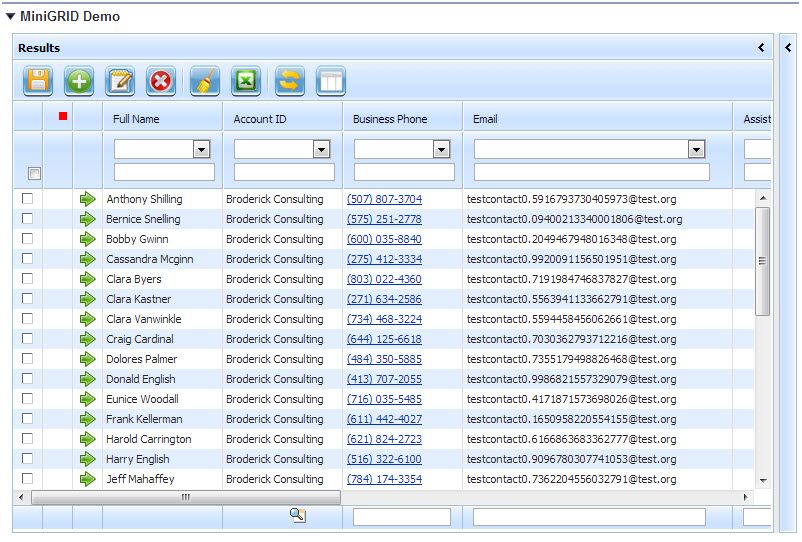
The Configero Mini-Grid for Salesforce gives users the power to dynamically search, filter and update thousands of records on Related Lists in native Salesforce Page Layouts.
Installation
The Configero miniGRID requires the free Configero Data Loader package. Please install this package first from the Appexchange.
Once the Configero Data Loader is installed, you can continue installing the miniGRID from the Appexchange listing.
Setting User Permissions

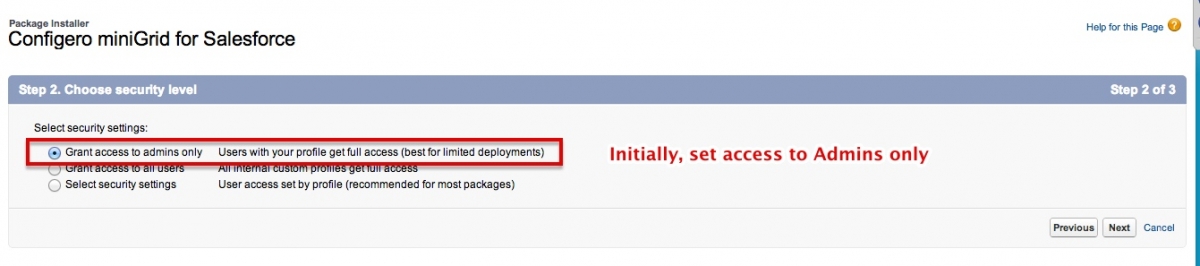
During step 2 of the installation process, you will be able to choose security settings for the miniGRID. We recommend that you ‘Select security settings’ and add the miniGrid permission to those users that need it.
Adding Your First miniGRID
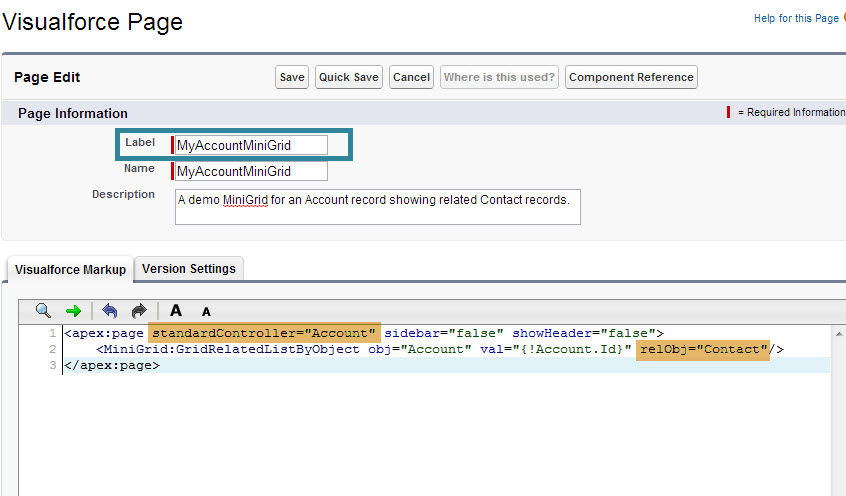
Go to Your Name -> Setup -> Develop -> Pages, and click on the New button.
Add the following code:
<apex:page standardController="Account" sidebar="false" showHeader="false">
    <MiniGrid:GridRelatedListByObject obj="Account" val="{!Account.Id}" relObj="Contact"/>
</apex:page>
Your Visualforce Page Editor should look like this:
Label: Give your Visualforce Page a label.
Description: This is optional, but can be helpful for other administrators down the road.
Options:
Where ‘standardController=”Account”‘ is highlighted, you can change that to any Object in your organization. You just have to use the API Name of the object.
For example: if you have a custom object called Project then you would change it to standardController=”Project__c”.
For Line 2: obj=”Account” would become obj=”Project__c” and val=”{!Account.Id}” would become val=”{!Project__c.Id}”.
Finally, relObject=”Contact” (Related Object) would be set to the appropriate related object records you are trying to display.
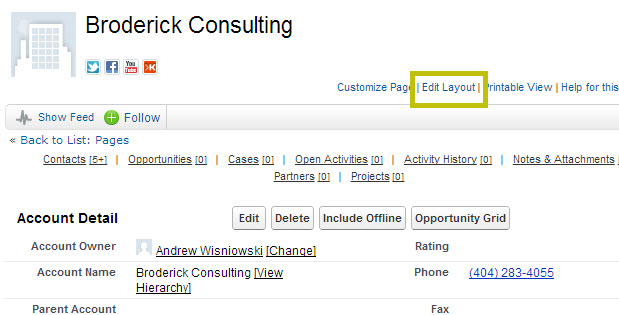
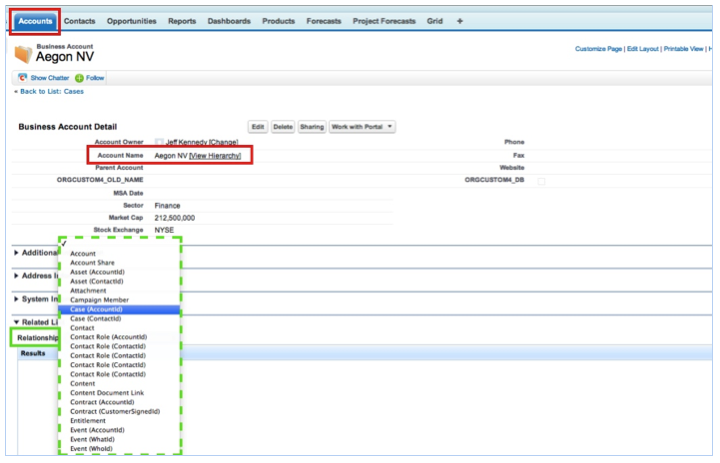
Go to any Account record, and press the Edit Layout button near the top of the page.
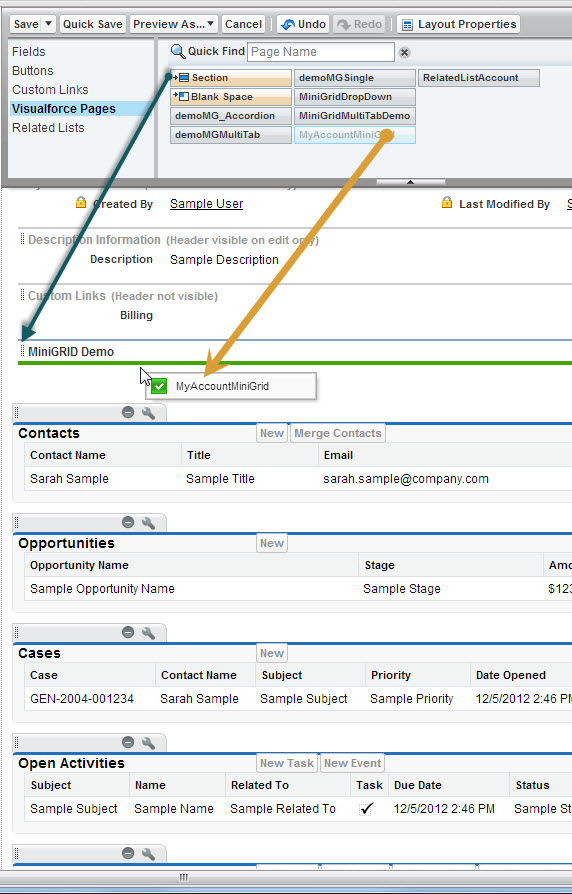
When the Edit Layout Interface opens, drag a new Section somewhere above the related lists, and then drag the MyAccountMiniGrid down into the newly created Section.
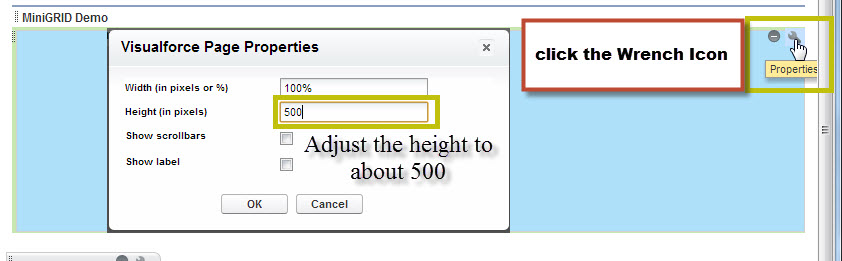
Next, click the Wrench icon on the shaded MyAccountMiniGrid area, and adjust the height to about 500.
Congratulations! Your MiniGrid is ready to use!
User Setup
Granting Access to Users
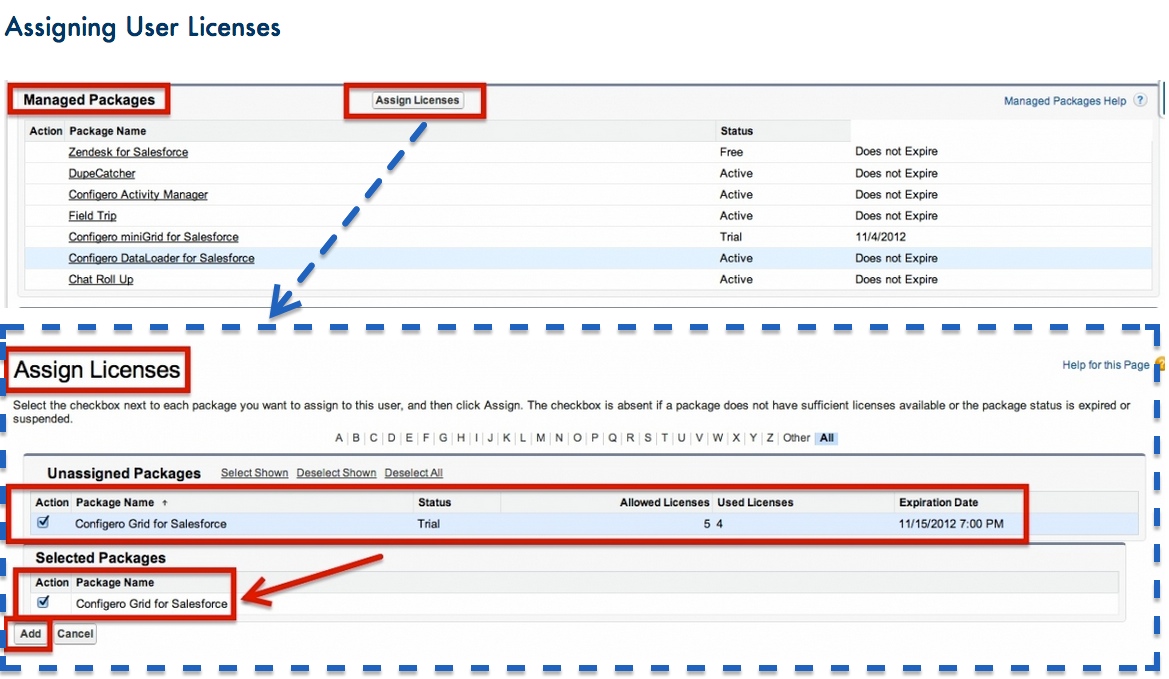
Assigning to Standard Salesforce User License
Select any user with a Standard ‘Salesforce’ User License.

Once you are editing the Users settings, scroll down to the ‘Managed Packages’ settings and click the ‘Assign Licenses’ button.
Business Case
Overview
Salesforce.com is a revolutionary tool for managing large volumes of data, but many users find it time consuming and inefficient to perform searches and updates in bulk across records, particularly on Related Lists within the native Salesforce Page Layouts. Built on the Force.com platform, Configero developed the Mini-Grid technology to address the limitations with standard, out-of-the-box related list functionality by delivering a rich user experience for bulk editing, business process execution and collaboration.
Use-Cases with the Mini-Grid have a great deal to do with the overall maintenance requirements on a System Administrator and equally on the overall End-User experience and adoption. Consider the following:
Example: Account Page Layout
Scenario
For this example, let’s assume an Org with three Business Units – Unit1, Unit2 and Unit3 – and 10 Related Objects that all link back to the Account object.
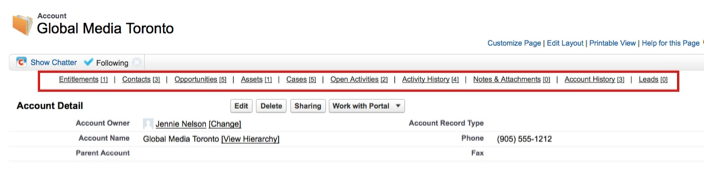
Above is a screen shot of a native Account Page Layout with 10 Related Objects:
- Entitlements
- Contacts
- Opportunities
- Assets
- Cases
- Open Activities
- Activity History
- Notes & Attachments
- Account History
- Leads
Unit1 wants the sequence of Related Lists to start with Cases, Entitlements and Contacts, Unit2 wants the sequence of Related Lists to start with Leads, Opportunities and Contacts and Unit3 wants the sequence of Related Lists to start with Open Activity, Activity History and wants to replace the Leads Related List with Campaigns.
Native Solution
Ideally, a System Administrator’s goal is to make as few Page Layouts as possible in order to provide consistency and efficiency in the User Experience across the Organization. Record Types, Page Layout Assignments and Field-level Security can definitely help with the scenario above; however, even with those features in use, today, a System Administrator would still have to either:
- Make multiple Account Page Layouts with different related list sequencing, different related list columns, different related list column sort order and so on
- OR
- Make a single global Account Page Layout that is a best attempt at related lists ordered in the most globally-applicable sequence, with the most commonly relevant columns in the most commonly accepted ordering on each related list
The Configero Mini-Grid Solution
With the Configero Mini-Grid, a System Administrator can create a single global Account Page Layout for the Account only that can include Account Sections and Account Field-Level Security as needed, but would not include any Related Lists.
Instead, the Account Page Layout would implement the Configero Mini-Grid to allow End-Users the customization and flexibility that each individual needs on any Related List.
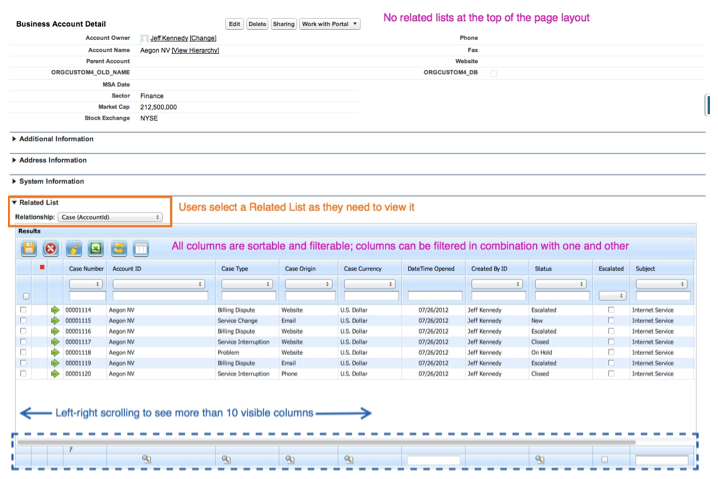
With the Configero Mini-Grid, End-Users have added flexibility, customization and functionality on Related Lists within the Parent Object’s native page layout. Each End-User can:
- Select the Related List Mini-Grid you need, when you need it
- Specify the columns that are displayed for a Related Object and the sequencing of those columns – the result is “sticky” per End-User (only limited by native object-level and field-level security)
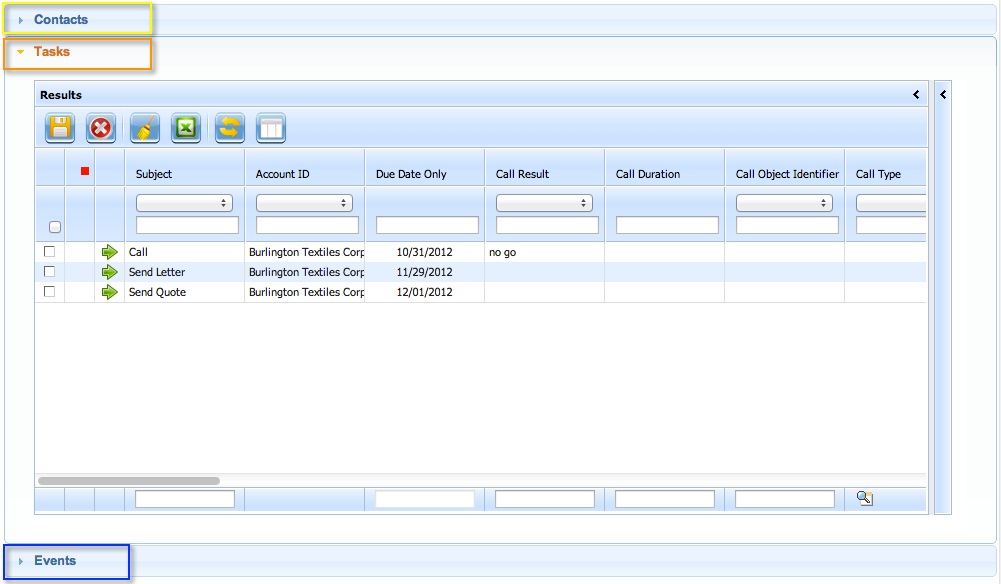
- Customize standard Related Lists such as Tasks, Events, Notes or Attachments
- Select more than 10 visible columns to be displayed in each Mini-Grid Related List at one time (again, respecting native object-level and field-level security); the Mini-Grid can be scrolled left-to-right in order to see additional columns
- Display more than 5 visible records in each Mini-Grid Related List from the Parent Object’s native Page Layout; the Mini-Grid can be scrolled up-and-down in order to see additional rows
- Filter each Mini-Grid Related List by any column at any time and combine column filters for maximum precision on a Mini-Grid Related List data set
- Multi-column Sorts – sort the Mini-Grid Related List by any combination of columns at any time
- Perform In-line Editing directly within the Mini-Grid Related List
- Perform Bulk Edit Updates directly within the Mini-Grid Related List
- Mass Export records directly from the Mini-Grid Related List
- Mass Delete records directly from the Mini-Grid Related List (so long as the End-User has been granted Delete permission on the Related Object)
General Usage
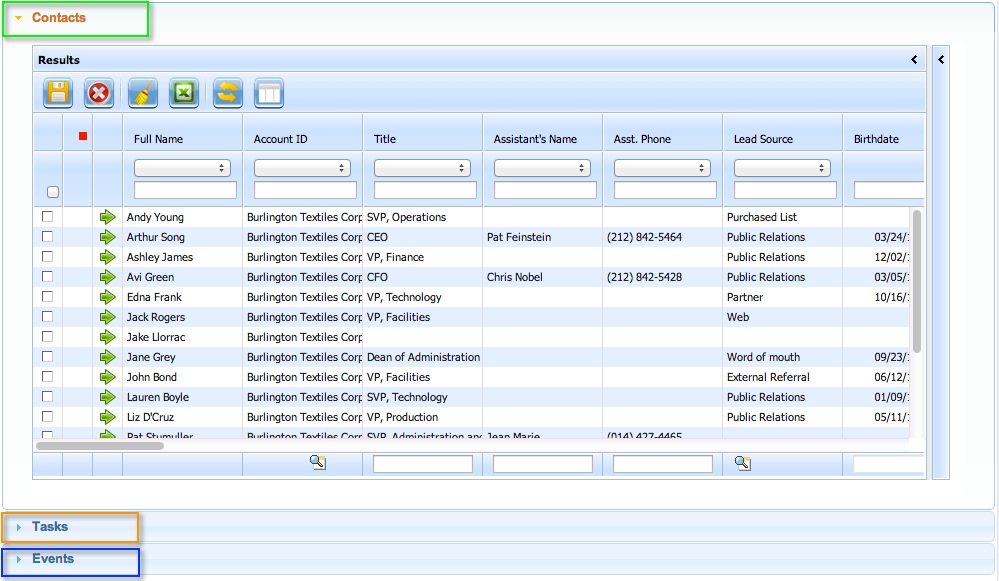
1. Select the Mini-Grid Related List you need, when you need it
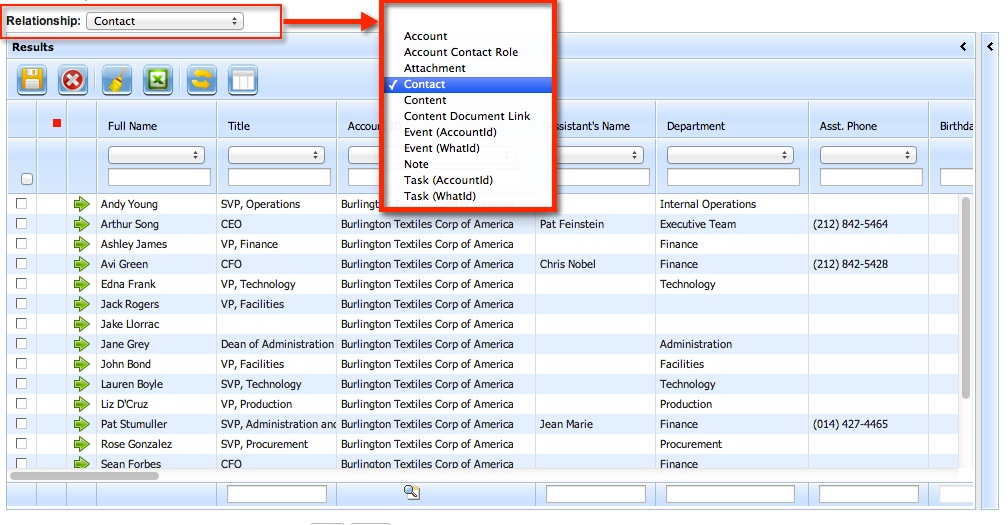
First, select the Mini-Grid Related List Object that you wish to drill into for dynamic filtering, bulk-editing, mass business process execution and/or collaboration.
Any Standard or Custom Object that has a Lookup or Master-Detail Relationship to the current Object is available for selection; however, native Salesforce functionality still applies. For example, all records that will be bulk-edited at one time must be of the same Record Type.
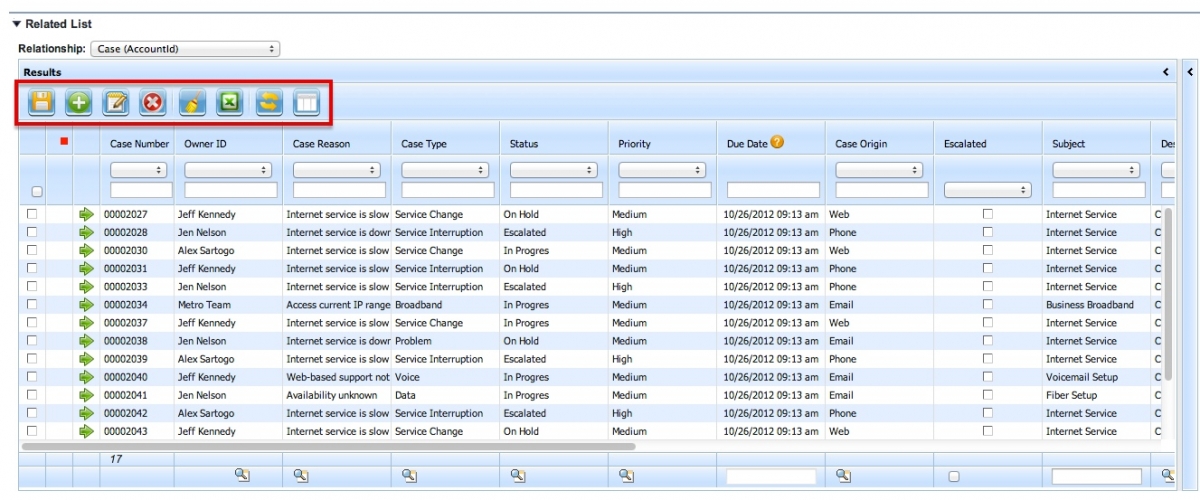
2. Mini-Grid Related List Buttons
All Mini-Grid Related Lists include the following 8 standard buttons:
- Save
- Add
- Edit
- Delete
- Clear Filters
- Export
- Refresh
- Hide/Show Fields
3. The Mini-Grid Related List’s Results Panel
The Configero Mini-Grid for Salesforce is highly intuitive and the functionality shown below applies to any object accessed through our Grids including data updates made via the Configero Data Loader for Salesforce, Configero’s Grid Application and Configero’s PSA App for Project Management.
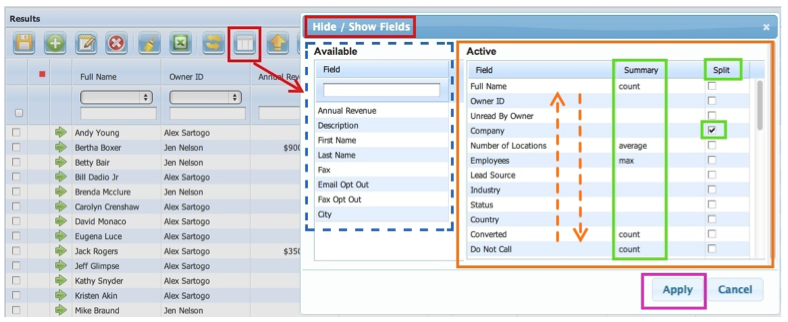
Customize the Mini-Grid Related List’s Results Panel
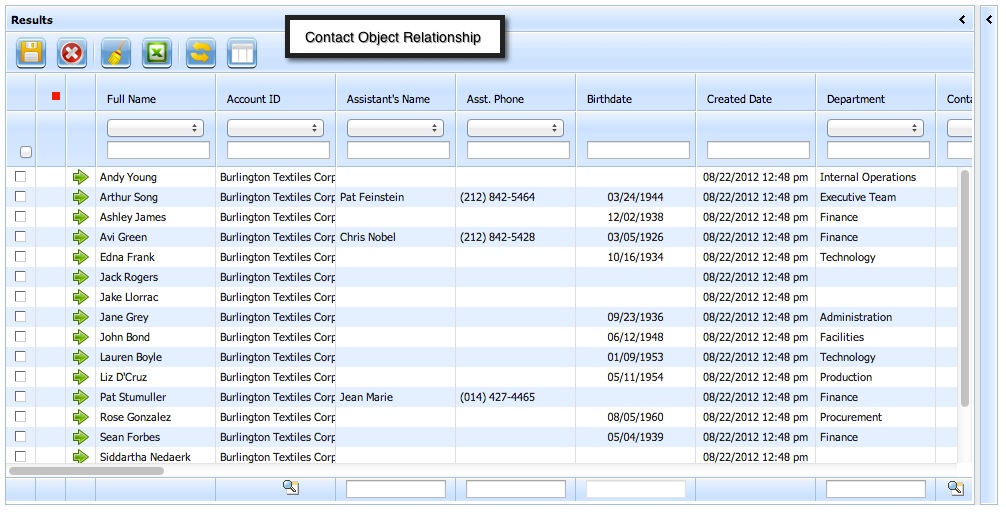
Each User has the flexibility to define which columns are displayed in his/her view of each Mini-Grid Related List and, as well, to define the order that the columns are displayed through a simple drag-n-drop interface. Additional column customizations include:
- The ability to define which column creates a “split” which will freeze columns to the left of the split as the User scrolls to the right on the Mini-Grid
- The ability to add Summary Totals to columns including such functions as COUNT, SUM, MIN, MAX and AVG
- The ability to display more than 10 columns in the Mini-Grid Related List at one time
Customize the Uncustomizable!
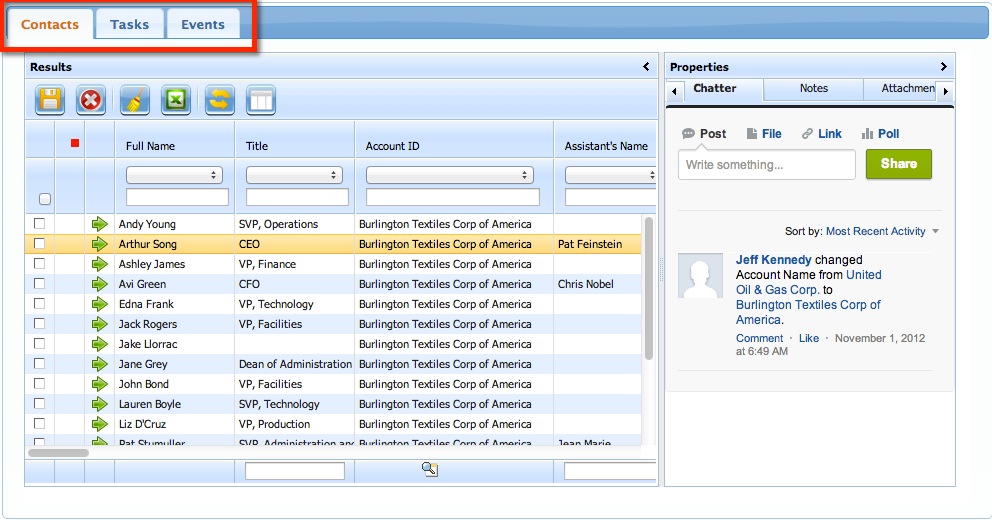
With Configero’s Mini-Grid for Related Lists, End-Users can now customize such Mini-Grid Related Lists as Tasks, Events, Notes or Attachments, all of which are historically uncustomizable in Related Lists, even by a System Administrator.
Use Multi-column Dynamic Filtering to narrow the Mini-Grid Related List’s Results
Once populated with records, multiple columns can dynamically filter the Mini-Grid Related List’s Results Panel at one time.
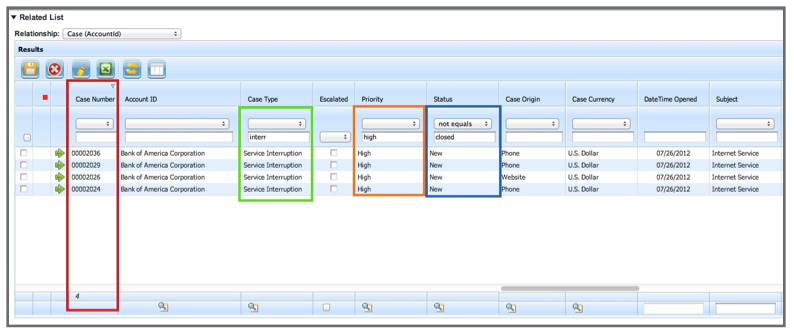
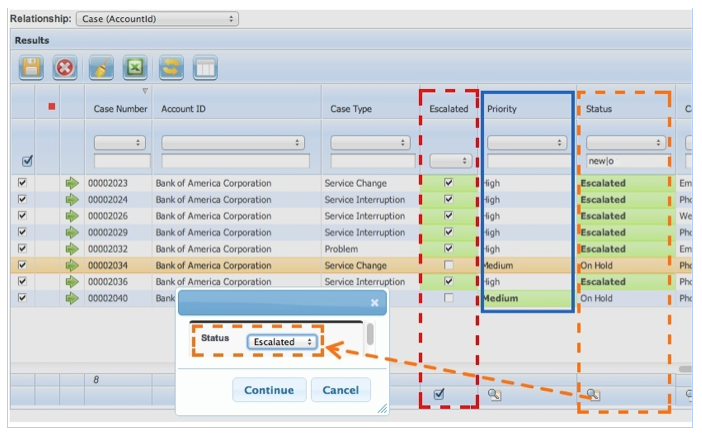
In the example below, the User has typed the string “interr” in the Case Type filter field and the string “high” in the Priority filter field – the default operation is LIKE and there is no need for the User to enter wildcards such as * or % around the string.
The User has also selected an operator “Not Equals” for the Status field along with the string “closed,” has sorted the Results panel in reverse order by Case Number and is Counting the number of Cases displayed:
Use Multi-column Sorts to Organize the Mini-Grid Related List’s Results
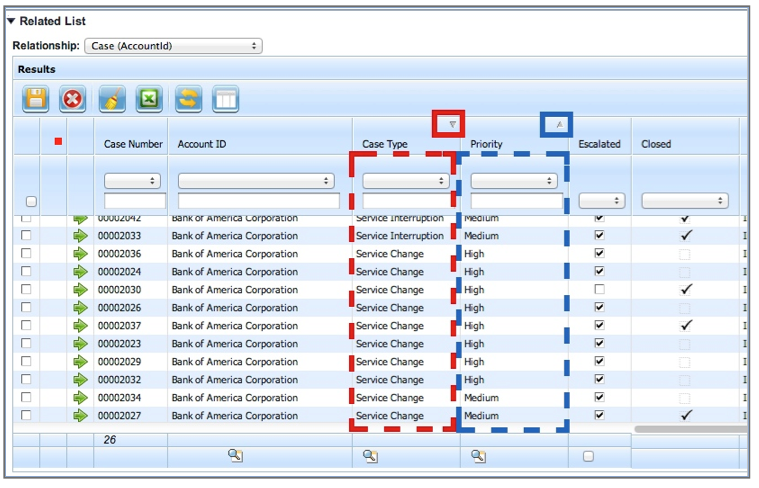
Once populated with records, Users can sort the Mini-Grid Related List’s Results Panel by multiple columns at one time.
In the example below, the User has clicked the Case Type column header twice to create a Primary Sort of Case Type – Descending and then used Shift-click on the Priority column header to create a Secondary Sort of Priority – Ascending.
Select Multiple Mini-Grid Related List Records for Bulk Editing
Multiple records can also be selected at one time from a Mini-Grid Related List and “Bulk Edited”; for example, all Cases Opened TODAY of Case Type “System Down” can be “bulk edited” at one time to Status “Customer Notification Posted” and Owner “Tier 2 Support (Queue)” as soon as IT has activated the “This website is temporarily unavailable” message.
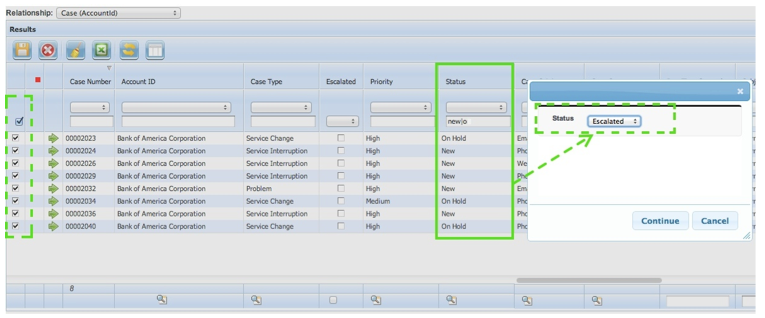
In the example below, a filtered list of Cases is being Bulk Edited for a change of Status; also notice how the Status field has been filtered using the string “new|o” – not only are we able to insert an OR into our default LIKE statement for filtering by using the “|” symbol (this is the vertical line just above the RETURN key of most keyboards), we have also demonstrated that the minimum length required for a text filter string is 1 character – we have filtered for any Case with a Status LIKE new OR o:
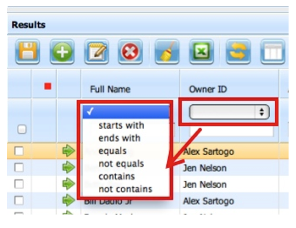
The header of every column in the Results Panel has additional Filter Operators for “Starts with,” “Ends with,” “Equals,” “Not equals,” “Contains” and “Not Contains” that can be used in conjunction with the text filter fields.
Use Native In-line Editing with Bulk Edit for Exceptions on Mini-Grid Related Lists
The Bulk Edit functionality can also be used in combination with In-line Editing for exceptions on individual records in the Mini-Grid Related List data set.
In the example below, the User has leveraged the Bulk Editing function on both the Escalated (check box) and the Status (picklist) fields and has also leveraged the native In-line Editing function to correct the Status, Escalated and Priority fields of rows 6 and 8 – all in one Bulk Edit session!
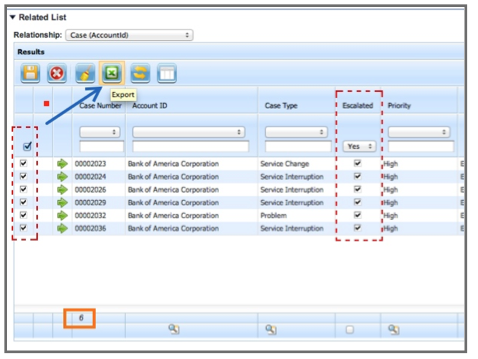
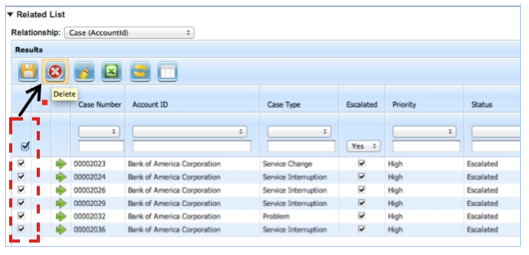
Select Multiple Records on the Mini-Grid Related List for Mass Export or Mass Delete
Multiple records can also be selected at one time in order to perform mass export or mass delete actions directly on any Mini-Grid Related List.
In the example below, the Related List of Cases has been filtered to only display those where Escalated= True. The user can multi-select All or Some of the Rows and then use the Export button to send this filtered Related List to a CSV file.
Alternatively, if, for example, the list of filtered Records needed to be Deleted and the End-User has Delete Permission on the Mini-Grid Related List Object, then the End-User can click the red X icon and mass delete records directly from the Mini-Grid Related List.
Advanced Features
MiniGRID with MultiTab View
Code Sample for MiniGRID with MultiTab View
<apex:page standardController="Account"  sidebar="false" showHeader="false">
    <link rel="stylesheet" type="text/css" href="//ajax.googleapis.com/ajax/libs/jqueryui/1.8.16/themes/redmond/jquery-ui.css"/>
    <script src="//ajax.googleapis.com/ajax/libs/jquery/1.8.3/jquery.min.js" type="text/javascript"></script>
    <script src="//ajax.googleapis.com/ajax/libs/jqueryui/1.8.16/jquery-ui.js" type="text/javascript"></script>
    <script>
        $(function(){
            $("#tabs").tabs();
        });
    </script>
    <style>
        h3 { display: block;}
    </style>
    <div id="tabs">

        <ul>
            <li><a href="#frame1">Contacts</a></li>
            <li><a href="#frame2">Cases</a></li>
        </ul>
        <div id="frame1">
            <MiniGrid:IFramedGrid obj="Account" width="100%" height="450" val="{!Account.Id}" relObj="Contact"/>
        </div>

        <div id="frame2">
            <MiniGrid:IFramedGrid obj="Account" width="100%" height="450" val="{!Account.Id}" relObj="Case"/>
        </div>
    </div>
</apex:page>
MiniGRID with Accordian View
Code Sample for MiniGRID with Accordion View
<apex:page standardController="Account"  sidebar="false" showHeader="false">
    <link rel="stylesheet" type="text/css" href="//ajax.googleapis.com/ajax/libs/jqueryui/1.8.16/themes/redmond/jquery-ui.css"/>
	<script src="//ajax.googleapis.com/ajax/libs/jquery/1.8.3/jquery.min.js" type="text/javascript"></script>
	<script src="//ajax.googleapis.com/ajax/libs/jqueryui/1.8.16/jquery-ui.js" type="text/javascript"></script>
    <script>
        $(function(){
            $("#accordion").accordion();
        });
    </script>
    <style>
        h3 { display: block;}
    </style>
    <div id="accordion">

        <h3><a href="#">Contacts</a></h3>
        <div>
            <MiniGrid:IFramedGrid obj="Account" width="100%" height="450" val="{!Account.Id}" relObj="Contact"/>
        </div>

        <h3><a href="#">Tasks</a></h3>
        <div>
            <MiniGrid:IFramedGrid obj="Account" width="100%" height="450" val="{!Account.Id}" relObj="Task" relField="WhatId"/>
        </div>

        <h3><a href="#">Events</a></h3>
        <div>
            <MiniGrid:IFramedGrid obj="Account" width="100%" height="450" val="{!Account.Id}" relObj="Event" relField="WhatId"/>
        </div>
    </div>
</apex:page>
MiniGRID with Single Object Relationship
Code Sample for MiniGRID with Single Object Relationship
<apex:page standardController="Account" sidebar="false" showHeader="false">
    <MiniGrid:GridRelatedListByObject obj="Account" val="{!Account.Id}" relObj="Contact"/>
</apex:page>
MiniGRID with Drop Down List
Code Sample for MiniGRID with Drop Down List
<apex:page standardController="Account"	sidebar="false" showHeader="false">
	<MiniGrid:GridRelatedListByObject obj="Account" val="{!Account.Id}"/>
	<script>
		CF_doWhenIdle(function(){
			CF_beginProgress('');
			var r = $("#relationships");
			var rel = r.get(0);
			if( rel.options.length > 1 ) {
				r.val(rel.options[1].value).change();
			}
			CF_endProgress();
		});
	</script>
</apex:page>
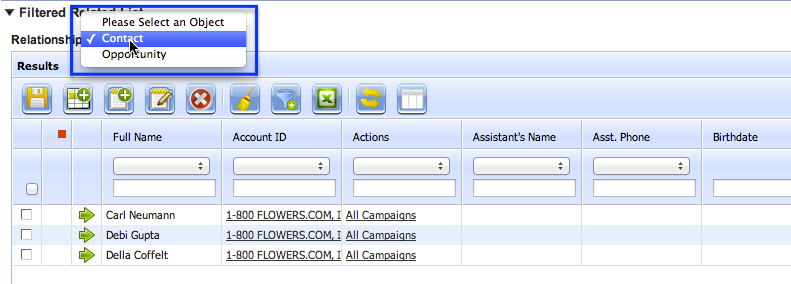
MiniGRID with Filtered Relationship Dropdown List
The default MiniGRID finds all relationships related to the current SObject. Using Javascript it is possible to filter the list to only the desired options.
<apex:page standardController="Account" showHeader="false" sidebar="false">
	<MiniGrid:GridRelatedListByObject obj="Account" val="{!Account.Id}"/>
	<script>
		CF_doWhenIdle(function(){
			CF_beginProgress('Updating SObject Relationships');

			//Create new array to store drop down options.
			filteredRels = [];
			filteredRelList = $("#relationships");
			//notice the empty() function call to clear out all options in the default Dropdown list
			filteredRelList.empty().append( $('<option />').val(0).text('Please Select an Object') ); //Default value

			//First filter out only Opportunity and Contact
			for( var i=0; i<rels.length; i++) {
				//console.log(rels[i].childSObjectAPIName + ' / ' + rels[i].relationshipName);
				if( (rels[i].childSObjectAPIName == 'Opportunity' || rels[i].childSObjectAPIName == 'Contact') && rels[i].relationshipName == 'Account' ) {
					//This will override the default 'rels' variable which holds ALL relationships to the object by default
					filteredRels.push(rels[i]);
				}
			}

			//Update drop down list to contain only filtered options
			for( var x=0; x<filteredRels.length; x++) {
				//Override the drop down list to contain only the desired values
				filteredRelList.append( $('<option />').val(x).text(filteredRels[x].childSObjectAPIName) );
			}
			rels = null; //Just for safe measure
			rels = filteredRels; //override the global var 'rels'
			CF_endProgress();
		});
	</script>
</apex:page>
Add a Button to your MiniGRID
You can also add custom buttons to do several common tasks, as well as other custom functionality using Javascript.
*Note: Custom Buttons can not be added to <MiniGrid:IFramedGrid/> components.
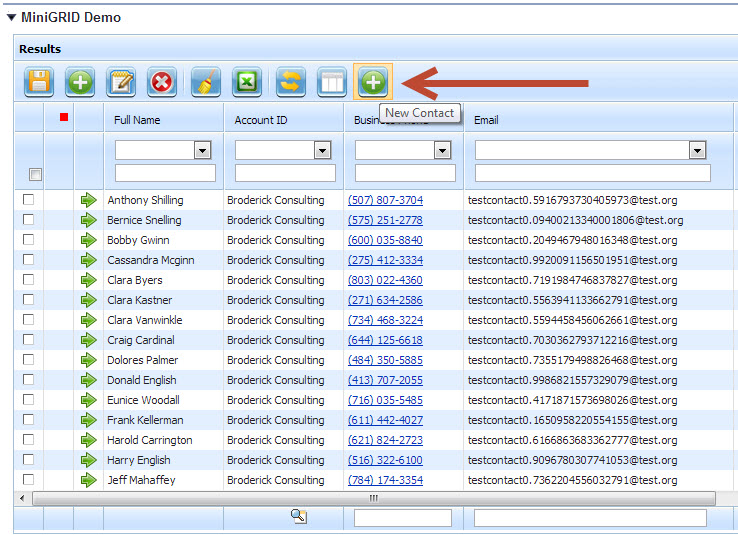
<apex:page standardController="Account"  sidebar="false" showHeader="false">
    <MiniGrid:GridRelatedListByObject obj="Account" val="{!Account.Id}" relObj="Contact"/>
    <script>
        function postProcessToolbar(toolbar, objType, grid_var) {
		    if (objType == 'Contact') {
		        toolbar.push(
	               {
	                   type: "button",
	                   id: "new_contact",
	                   img: "Configero/add.png",  // you can replace this with any image you like
	                   tooltip: 'New Contact',  // put in whatever tooltip you want here
	                   onClick: function(grid) {
	                       window.open('/003/e?retURL=%2F003%2Fo&ent=Contact&accid={!Account.Id}');
	                   }
	               }
		       );
		    }
		}
    </script>
</apex:page>